Wednesday, September 25, 2013

Granola Bites


These are a simple and a delicious snack that our family really enjoys.  The thing I like about these types of granola treats is you can add whatever you want to them so that your family will love them. 

I usually follow the recipe from A Kitchen Addiction  to a tee cause they are very tasty but yesterday I didn't have any flax or oat bran so I had to substitute; here is what I did. 

1 1/2 cups of oats
1 cup of Rice Krispies
1/2 tsp salt
1/2 cup natural peanut butter
1/2 cup of local honey
1/3 cup mini chocolate chips
2 packages of peanut M&M's

1.  In a bowl combine all your dry ingredients
2.  Mix in your peanut butter and honey
3.  Refrigerate for 15 minutes if the mixture is too sticky to form into balls. 
4.  Form into 1 inch balls 
5.  Store in the refrigerator or freezer


Let me know if you try any fun combinations!  And for more snack attack ideas check out my pinterest board. 


Monday, September 16, 2013

Cereal Squares


This recipe was a very impromptu  creation after receiving a box of peanut butter cheerios from a friend.   The cereal was loosing its crispness so I decided to toast it in the oven.  This little trick has saved us from throwing out cereal so many times.  


After it was toasted I decided to use up some open bags of marshmallows, that were left over from our summer adventures, and make some cereal squares with them. 


I followed the basic rice crispy recipe by melting a little bit of butter in a pot along with the marshmallows.   When the mixture was nice and gooey I added in the cereal.  


Because I wasn't making a large batch I decide to put it into a pie plate.  


Once the squares had set I just took the parchment paper out of the dish and cut up the squares like a pie. 


The kids loved these little treats!  


So next time you have some "going" stale cereal be sure to toast it up and make something yummy from it. 

Friday, September 6, 2013

Back to School

This week we started our first week as a 1st grader!!!  And you will never guess what happened the night before school...yup Eben lost his first tooth.  He was sooooo excited to lose his tooth right before school started. 

The week before school started we had a count down to grade 1 written on their bathroom mirror.  Each night Eben crossed off how many more days before school started.  He was excited to find a new message on Tuesday morning that said Welcome to Grade 1.


We started our morning off with of course the first day of school photo shoot using these cute printables from I heart nap time. 


I had some fun activities planned for the 1st day that I found on pinterest.   So we spent most of the morning doing some back to school activities.  Eben loved doing this back to school word search.  He also filled out an all about EBEN sheet; which I will keep in this school portfolio.  


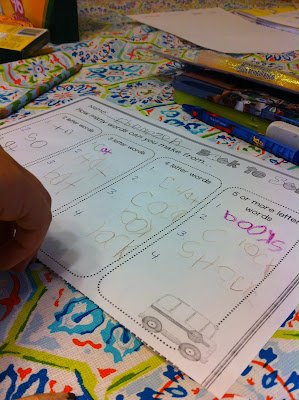
Another little game we played was this back to school word scramble. I cut all the letters out and Eben rearranged them finding 2,3,4 and 5+ letter words.  He did so well at it I think he is ready to play boggle.


Then we got to the work that we are going to be doing.  One thing that we need to work on his hand writing.  So last year at our annual homeschool conference I pick up this hand writing without tears book.  Eben is doing good at it so far.


Another thing I did before school started was create a month of supper meals and a month of lunch meals.  That way I could just look in the morning at our menu; take out what I need to for supper and prepare anything I need to for lunch time.  The first day I had muffins planned for lunch so during our "recess" time I mixed the muffins together and had them baking during our second part of school.  I am so happy I spent some time to do these two menus it has saved so much time this week knowing what I am doing :)  Today I am stepping outside the menu a bit since we had breadstick last night for supper and have a few left over I will serve them today for lunch with pizza sauce instead of the homemade lunchables that were planned...so even with a plan you can be spontaneous. 


Wednesday, September 4, 2013

Princess birthday cake


This weekend we were so blessed to celebrate Lady J's 3rd birthday!!   It was a very fun weekend for her as she caught on very quickly (not sure if its a girl thing or not) that her birthday was coming up.  She knew who she wanted to invite, what she wanted for a cake and what she wanted for presents.  We took notes and did our best to give her a princess party.  

When she told me a couple of weeks ago that she wanted a princess cake I immediately thought about the kind of cake that you stick a barbie in; when I showed her a picture and asked is this what you want she said YES.  So plans began to form about how I was going to make this thing.  Thankfully I have some GREAT mama friends who are awesome at this kind of stuff and gave me lots of advice and tools to get the job done.  

I decided for the "dress" part of the cake I would use a cake mix, I know I said it, a boxed cake mix and bake it in the pampered chef 8 cup mixing cup.   When the cake was finished cooking/cooling I did carve out a little hole in the top with an apple corer for the barbie to fit in.  I had thought at first her whole body would fit but the cake didn't turn out to be that high so I had to remove her legs, thankfully its a "newer" type barbie who's legs come on and off easily.  I did that Friday and froze the cake so on Saturday when I went to frost it it would not have crumbs. 

Saturday we got to work...Jaelyn actually entertained me with her pre-party get up.  


When I went to decorate the cake I simply wrapped the barbies bottom half with some plastic wrap and put some frosting in the hole and placed her in.  

To frost the cake I did a first coat where I just spread frosting all over the "dress" part and then let cool in the fridge. 


Then I began the decorating part using a flower tip (I think that is what its called) starting at the bottom and working my way up to the top.  I did take some breaks putting the cake in the fridge to harden the icing. 


The day of the party our house was pink pok-a-dots.  We had party hats, popcorn boxes and banners.  We did get some princess plates and napkins as well.


The cake was a hit!!  Lady J loved it so that is all that mattered.  


Happy 3rd birthday Lady J!!!  


If you need a recipe here you go.

Boxed Cake Mix
Icing (went to a bakery and got a tub of white and dyed it pink myself)


Some tips:
If cooking in a 8 cup measuring cup be sure to bake at 325 for 1 hour or until the centre of cake is set.
Cut whole in cake before freezing
Freeze cake before icing to help with crumbs
Ice cake first, let set then begin decorative work


Related Posts Plugin for WordPress, Blogger...