Thursday, January 29, 2009

Freezing Produce

During this time of year its hard to get produce without breaking the bank. One thing that we have done to help keep us on budget is buy produce during prime seasons and freezing. We do this with fiddle heads (that hubby picks), squash, blueberries, strawberries, and apples. Another thing that I do is when I go grocery shopping early in the morning I find lots of produce on the 50% off rack. I stock my chart up with green peppers, red peppers, mushrooms, and any other fruits that are not too rotten. When I come home I wash them up, cut into chunks, and freeze in a single layer on a cookie sheet.


Once these are frozen 3-4 hours after wards I bag them up in freezer bags and place them in the pizza topping basket in the freezer.


I love to have frozen produce in the freezer. Although you can't use this stuff for salads or veggie sticks its great cut up in chili, spaghetti sauce, casseroles and fried up on pizza.

For more frugal tips check out Biblical Womanhood

Baked Oatmeal

This morning we woke up to lots of snow on the ground. Without complaining hubby was up, dressed and out the door to snow blow the drive way. It helps that he is still in the honey moon faze with the snow blower and enjoys doing it. Since he was up and so was the baby I decided that he would need a delicious hot breakfast when he was done.


Friends of ours enjoy baked oatmeal at least once a week. I had never made it before but last time we were down at my parents house my mom tried the recipe. We all enjoyed it so that is what I whipped together this morning.

I followed a recipe I found at all recipes.

3 cups rolled oats
1/2 cup  brown sugar
2 teaspoons ground cinnamon
2 teaspoons baking powder
1 teaspoon salt

1 cup milk
2 eggs
1/2 cup melted butter
2 teaspoons vanilla extract


Preheat oven to 350 degrees F (175 degrees C).
In a large bowl, mix together oats, brown sugar, cinnamon, baking powder, and salt. Beat in milk, eggs, melted butter, and vanilla extract. Spread into a 9x13 inch baking dish.
Bake in preheated oven for 40 minutes.


The house smelled so delicious as this was cooking. We enjoy our oatmeal topped with yogurt, fruit and toasted nuts. 


Wednesday, January 28, 2009

falafels


Here is it readers one of my new favorite crock pot recipes. I have heard so many people say to me I have a crock pot but I just don't use it. WELL now is the time to get that baby out of the box and put it to good use. There are lots of recipes out there for great meals that can be made in the crock pot. I am sure that many of you know the site 365 days of crockpotting. The wonderful crock pot chef Stephanie decided to use her crock pot everyday last year and post each recipe. She has finished her little one year challenge and is working on her own cook book from it. If you need some recipes to start your crock pot adventures check out her list of recipes here.

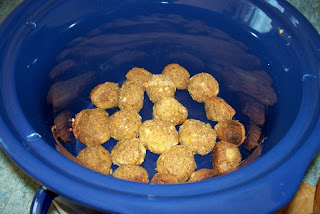
I have enjoyed the recipes I have tried from her site and when I saw this Falafel recipe I knew that I had to try them. So last week I meal planned it, made pitas and bought the ingredients for it. I was a little unsure about them when I started but the recipe was super easy to follow and in 3 hours they were done!

They turned out nice and brown and some even got really crispy. I think that next time I will have to cook mine for less because 3 hours was a little much and some were dry. I think that the next time I made them I will roll them in sesame seeds before I place them into the crock pot.

We put ours on homemade pitas that had been smothered in Tzatziki sauce (that I purchased on sale) and topped with spinach, green peppers and red peppers.

Here is my brave (and very hansom) husband getting ready to take the first bite! hehe We both enjoyed them and thought they were a very good meal. I did try to make some couscous to go with our meal but it was very bland!! If any readers has some yummy couscous recipes please share them with me!

For more fun works for me head on over to rocks in my dryer.

Monday, January 26, 2009

Meal Plan Monday


I can't believe another Monday is here already. I didn't have time this weekend to meal plan so I am a little behind and had to do some meal planning as I walked the aisle at the grocery store this morning. That is never a good thing; I realized that meal planning saves SO much time and money. When I don't have a plan for the week I find I just buy whatever and that always leads to over spending.

Here is what I came up with for a menu this week

Monday: Soup and sandwiches

Tuesday: Spaghetti Pie and Bread sticks

Wednesday: Left overs

Thursday: Sweet and sour sausages

Friday: Pork chops, mashed potatoes and sweet potatoes

Saturday: ??

Sunday: Going home for a yummy supper and SUPER BOWL TREATS!!


For more ideas check out Organizing Junkie

Friday, January 23, 2009

Pizza Pockets

This is one recipe that does take some time but the benefits of having quick and easy lunches or suppers are worth the little bit of work. Since hubby and I have been married I have never once bought pizza pockets. They are a tiny little ball of dough filled with processed meats that have been pre deep fried and will cost you a fortune for four...which would be one meal for us. Since I make pizza at least once a week I thought why not whip up a batch of pizza pockets to have in the freezer for days that I don't have leftovers for Micah to take to work or night when we need to eat in the car.

So one day last week I mustered up the courage to make my pizza dough into pizza pockets. Here is my step by step process.

First I started out by making a batch of my yummy pizza dough


After the dough had set I punched it down and divided it into 12 balls.

While the dough was resting I whipped together some ingredients for the inside of the pockets. I had sauce, some fried ground beef, grated cheese, pineapple chunks and I fried up onions, green pepper, red pepper and mushrooms.

Then take each dough ball and roll it out to make some what of a circle.


Place 1-2 Tbsp of sauce in the center and top with toppings. Then fold in half and using a fork press the edges together.

I then baked the pocket in the oven on 350 for about 12 minutes.

When the pan came out I let it cool off a bit then placed in the freezer for about 3 hours.


Once they were frozen I popped them into a freezer bag where they are ready to be taken out and placed into the oven. You can heat them up at 400 for 10-12 minutes. At work Micah likes to defrost it a little in the microwave then heat it up in the toaster oven.

These are such a frugal thing to make for the little bit of work it took. Now I have fast suppers or lunches for us. This is something that we will keep in the freezer!!

For more frugal ideas head on over here

Wednesday, January 21, 2009

yummy muffins


I really love this recipe and thought that I would share it. I did originally get it from another blog and please forgive me for forgetting which one it was, if it was yours send me the link and I will for sure link it up!


Chocolate chip muffins


Ingredients

1 3/4 cups white flour
1/4 cup whole wheat flour
1 tsp salt
1 tsp baking soda
1 tsp baking powder
1 tsp cinnamon
1 cup buttermilk (used 1 cup skim milk with 1tsp vinegar)
1/4 cup apple sauce
1/4 cup oil
1 egg
1 cup chocolate chips (you could use a little less...some where VERY chocolaty).

Directions

Preheat oven to 400 degrees. Mix all the ingredients together, except for chocolate chips. After it’s mixed, stir in the chocolate chips. Fill greased muffin tin (or use your silicon baking liners) and bake for about 12-15 minutes or until golden brown. These muffins can also be frozen and reheated in the microwave or oven.

Makes 12 muffins

Here is my nice clean muffin tin; because of my wonderful silicon baking liners. If you haven't started using them head over to my previous post(link above) and find out for yourself why you should RUN out and get some. This $3 purchased has given our family fresh baked muffins at least once a week.

Tuesday, January 20, 2009

Whats in the middle???

Oreo dessert is one treat that hubby always request on his birthday along with Mexican pile up. These are two very yummy treats that we enjoy eating. I will post on Mexican pile up later; but this post is all about the Oreo's!


First off I got a huge bag (the family pack) of Oreo's cheaper then a smaller bag. I can't believe how expensive these little round cookies will put you back. Thank you Lord that I found such a great sale.


Recipe

32 oreos
1/2 cup melted margarine
2 L vanilla ice cream

Chocolate Sauce

1/4-1/2 cup evaporated milk
2/3 cup sugar
1/4 cup margarine
1 square semi sweet chocolate
1/2 cup peanuts


1. Place Oreo's into a large Ziploc baggie. Using a rolling pin crush, crush, crush until the once rolled Oreos are nothing but a fine powder. Pour the crushed Oreo's into a small bowl and coat with melted butter. Spread into a 9*13 pan to form a crust and freeze.

2. Take out your 2 L of ice cream and allow to soften for a bit. Next take out your frozen crust and spread soft ice cream on top; freeze again.

3. The last step is easy you simply make up your chocolate sauce
melt margarine and chocolate square. Add sugar and milk. Bring to a boil. Reduce heat and boil gently until thickened for about 15-20 minutes-stirring frequently.

4. Place chocolate sauce in fridge and allow to cool for about 10 min. You don't want to add super hot chocolate sauce to frozen ice cream. When cool drizzle chocolate over the top and top with peanuts. Freeze again until ready to serve

* One thing to note is that it is best if you freeze in a deep freeze. For some reason it doesn't freeze as hard in a fridge freezer.


I usually always place mine in a 9*13 pan but one friend of mine who LOVES the recipe does here's in a round spring form pan. So it looks more like an ice cream cake. If you are going to do it this way I would recommended putting something as a middle layer in the ice cream like crushed Oreo crumbs or even putting a layer of the chocolate sauce in the middle with peanuts then again on the top.


For those of you who know Micah he doesn't really like to venture outside of a recipe. So you can image how shocked I was when he suggested a few changes we could make to Oreo dessert. A Christmas treat that he received this year was a 2 L tub of black raspberry cheese cake ice cream, which is his favorite. Since this was still pretty full he suggested we use that instead of vanilla. I thought since we were using that kind of ice cream I would add some frozen raspberries to the top that were frozen in the freezer. This was a great combo and very delicious. Everyone at the party enjoyed it!!


Sunday, January 18, 2009

Meal Plan Monday

Last weeks meal plan went so great surviving our week without meat! We were however one musical family after 5 days of beans, lentils and vegetables on the menu! hehe...

We started the week off with a delicious new BBQ lentil recipe I found over at $5 dinners. The next day I wanted to use up some left over baked beans I had in the fridge so I decided to make some MEGA bean chili.

This chili was packed full of beans. I had leftover baked beans in it, the left over lentils and 2 cans of beans. I served it up with some yummy corn bread.

I will be posting about two successful new recipes that I made this past week. One was pizza pockets and the other was crock pot falafels.

We broke our no meat fast on Saturday when hubby cooked up some honey garlic sausages, mashed potatoes and a nice spinach salad. We were suppose to have ribs but I didn't have any honey so we will have to try that recipe another time.

Whats cookin this week

Monday: Pork fajita with spinach salad

Tuesday: Thai Turkey Stir fry over rice

Wednesday: Leftovers

Thursday: Pancakes

Friday: Pizza

Saturday: Spaghetti and garlic toast

Sunday: Soup in the crock pot

for lots more meal plans check out Organizing Junkie

Thursday, January 15, 2009

A great deal Bday party


I am so glad that Micah's birthday is just weeks after Christmas. This has been so wonderful for getting great deals on party stuff. This year I really cleaned up on some Christmas party mark downs for his birthday.


His favorite color is green so I started out by picking up these plastic cups (which are heavy enough to wash and reuse) and plastic cutlery for a little over a buck each. There were 100 cups and 70 plus utensils.

The plates, napkins (in the basket) and table cloth I picked up the day of the party marked down for dirt cheap. They all had a bit of green in them and it made the table look wonderful for his birthday party.


I love using my canning jars to hold things. Since the cutlery was green these kind of looked like little Chia pets on the table.


If you have the storage; after the holidays is such a great way to pick things up for next year or even putting colors together for birthday parties. I did a lot of after Christmas shopping this year stocking up for next year. The new LED lights were marked down for sooo cheap!! Next year we will be having lights outside the house!! Yippee!!

For more frugal ideas head on over to Biblical Womanhood.

A nice warm supper meal

With the temperature dropping to -27 with the wind chill I decided to make a nice warm soup tonight for supper to help us stay warm. It taste so delicious that I just had to pull myself away from the pot to come share my concoction with you all.


Vegetable curried chowder

5 Potatoes
5 Carrots
Onion
Chicken stock
Water
green lentils
Curry powder
Tarragon
1 can cream corn
Frozen corn
Left over mashed sweet potato
1 can evaporated milk
Salt and Pepper
~ Cover the vegetables and lentils with chicken stock or water or a mixture of both. Bring to a boil and add curry, garlic powder or real garlic and tarragon (one of my favorite soup spices). You can also add turnip, parsnip or celery. I only added what I had on hand.

~ When the vegetables where cooked through I added 1 can of cream corn and some frozen corn. Also I had some mashed up sweet potato in the fridge so blended that together with some of the evaporated milk to make a nice puree before adding it to the chowder. Stir it all together and add more curry and tarragon until you get the taste you are looking for!

~ If you want you can add a couple of honey garlic sausages, cut in bit size pieces, to the chowder. This adds a VERY delicious flavor.


We are going to be enjoying this for supper tonight with soda crackers and pita bread that I made yesterday. What a great way to get your vegetables for the day!!! Instead of using sausages because of our meatless week I decided to add some green lentils to the chowder to give us some very healthy protein.

Wednesday, January 14, 2009

The best mom at the bake sale!!

This weekend I went away to spend the weekend with my bestest friend and her family. It was her birthday so her wonderful sister decided she would through her a birthday party. Krissy, who is a faithful reader, was hard at work in the kitchen preparing for the party.

She whipped up a great little treat that I just had to post about. These little treats will definitely earn you the "best mom at the bake sale" award.

They are so delicious and so easy to make.

Ingredients

Pretzels
Hersey Kisses
Smarties or M& M's

1. Place pretzels in a signal layer on a cookie sheet. (don't try to make too many in one batch, you need to be able to place the smarties or M& M on them before they cool down.)

2. Place Hersey kiss on the middle of the pretzels.

3. Bake at 200 for about 3 minutes or until chocolate is soft.

4. Moving as quickly as possible place your smarties or M& M's on the chocolate. Cool and ENJOY!!

~ These can be stored in the fridge in an air tight container if you have any left to store!


A frugal idea for this snack is to watch for when kisses and hard candies such as smarties and M &M's go on sale after a holiday, check out my friend Niki's post about it. You can keep these chocolate pieces in the freezer until needed. Look for festive colors to make for when you kids need to take a treat to school for a special party!!

For more cool ideas check out Rocks in the dryer

Tuesday, January 13, 2009

I'm 2 for 2

Before Christmas I posted on how I had made a delicious recipe of honey baked lentils for friends of mine who just had a baby. Hubby and I enjoyed it and so did our friends. So with some new recipes in my google docs I decided to give another recipe a try. I am really enjoying Erin over at $5 dollar dinners. I am working on a Canadian or should I say maritime version to see how many of meals are under $5 bucks.

So last night I whipped together some BBQ lentils. OH boys were they delicious. We are really loving lentils so now I am 2 for 2! All I did was follow the cooking instructions on the green lentil bag, added some minced onion, garlic, BBQ sauce and brown sugar. I served it over rice with some frozen veggies. * Picture is from $5 dinner site.


Hubby gave the meal a 4/5... it didn't get 5 because there was no meat in it! heheh....Even the little guy ate it up. Lentils are such a wondeful food filled with lots of nutrients. Canada's food guide recommends that we consume lentils, beans and tofu often. One of our goals as a family this year is to eat proper portions and to consume 2-3 meals each week that have just beans and lentils. This will help our bodies and our grocery bill!!!

Sunday, January 11, 2009

Monday Meal Plan

This is going to be a quick post of our meal plan for the week and who knows if we will get to do it. Today the babe has been sick so we are going to try everything we can NOT to get this flu bug...so here is what our menu will look like for the week and if we do end up getting sick then its ginger ale and soda crackers for us!


Monday: BBQ lentils over rice

Tuesday: Mega bean Chili with corn bread

Wednesday: Veggie Pizza pockets

Thursday: Left overs

Friday: Crock pot falafels in home made pitas with veggie sticks

Saturday: South west ribs with rice


If you didn't notice this week Micah and I are going to try our very hardest not to eat meat or cheese (Saturdays supper is a reward for going 6 days without meat).

For more creative meal plans head on over to Laura's site

Wednesday, January 7, 2009

Coffee cup sleeve


I saw this very cute gift idea just weeks before Christmas on Amys Notebook and with lots of gal friends being the coffee lovers they are I thought what a great little gift for them.


The pattern is from Canadian Living and was very easy to do. It took me about 3 sleeves before I could make them look really nice in about 1 hour. I think that one of the learning curves was purling since I have only ever straight knit before (please remember readers I only started knitting early this fall).


I can't wait to see the gals using their cute little sleeves to keep their second cup java's warm!!


Check out rocks in my dryer for more cool ideas

Monday, January 5, 2009

Meal Plan Monday


Here is my first meal plan for the 2009 year! But first let me start off by telling you all what we did new years eve. My in laws were up and some good friends in town so we decided to have them over to our place for raclette pizza. Now I am sure some of you are like raclette...what is that. So if you jump over here you can find out all about the special cheese and the machine which is called a raclette machine. We have used our machine for this special type of cheese before but many times we use it to make individual pizzas. Its really fun to do especially when you have company.


Our machine can make 8 mini pizzas at once. So there is a big bowl of mini dough balls (made from my great homemade pizza dough recipe) in the middle of the table. Then there are lots of mini bowls filled with all kinds of pizza toppings. Here are some of the things that were on the table.

Turkey sausages (ground up and out of the casing)
Italian sausage (ground up and out of the casing)
Taco flavored ground beef
Turkey
Pizza meats (ham, pepperoni, salami)
Onions
Red, Green and Yellow Peppers
Pizza sauce
BBQ sauce
Shrimp
Taste of Thai land sauce (for the shrimp)

Also to go along with our pizza I whipped together some homemade garlic fingers. Using my pizza dough recipe I simply covered the dough in garlic butter and mozzarella cheese. Then to dip them I made up some YUMMY donair sauce. Since trying this recipe I can't eat pizza or garlic fingers without this on the menu!!


The recipe is

2/3 cup canned milk (evaporated, and cold, is best)
2/3 cup sugar
1/4 cup vinegar (I would cut this back next time)
1/2 tsp garlic powder

1. Stir canned milk, sugar and garlic together until sugar and garlic is dissolved.
2. Add vinegar and continue mixing. The quicker you add the vinegar and the less you mix, the thicker the sauce is.
3. Let sauce sit in the fridge for about an hour before using.
4. If the mixture separates, don't worry. There is no need to remix it, it will taste fine.
5. The sauce can be made in larger batches. Also it freezes well.


Now that the holidays are over its back to the everyday routine. I have some new recipes that I want to try out and I am going to be making a list of freezer meals. There were many times over the holidays that I wish I would have been able to pick something out of the freezer and pop into the oven. I am not going to spend my days bulk cooking and freezing but I do think that I will make some double batches of things when I do cook! I will let you know how it goes.

So for this week here's whats cookin in the kitchen!

Monday: Ham steak, mashed potatoes and squash

Tuesday: Turkey pot pie. I am going to be using this recipe for pile high veggie pot pie and add turkey.

Wednesday: Hubby's birthday party!! Mexican Pile UP, Here is a post from a couple years ago when we had a party for Micah on how to make his favorite birthday meal! OH if you haven't already you should check out hubby's early birthday gift!!!

Thursday: Sausage Marina over pasta

Friday: Leftovers - I may be away

Saturday: I have planned refried bean nachos but I may be on a little vacation visiting my bestest friend for her birthday!!!

Sunday: If I am back and if hubby goes with me then I will make the nachos for supper here


For more ideas check out Organizing Junkie
Related Posts Plugin for WordPress, Blogger...