Tuesday, February 14, 2012

Chocolate dipped brownies

Happy love day readers!!!  We finally made it to February 14th.   We have had too much fun already today its hard to sit down to write a blog for you all.  Yesterday the kids and I made little desserts for us to enjoy tonight after supper and we indulged last night in a few just to make sure they were good enough for love day.  Tonight we are dressing up in fancy clothes (lady J and I in dresses and the boys in their suite jackets) and we are setting up the kitchen like our own little restaurant.   Eben is into Sonic (the video game) right now so its called the Sonic restaurant.  For the menu Micah and I will enjoy some shrimp fettuccine Alfredo and Eben has requested jelly sandwich in the shape of a dinosaur; so I think I can do that for him. 

Anyways back to the brownies.  Sorry I only have the finished product.  I am so bad at taking pictures of the whole process. 


 Here is the recipe I used.  

1 cup butter
1 cup white sugar
1 cup brown sugar
1/2 cup cocoa
4 (beaten) eggs
2/3 cup flour
1/2 tsp salt
1/4 tsp baking soda
1 tsp vanilla
2 cups chocolate chips  (I used 1 cup chocolate chips and 1 cup Skor)

1. Pre heat oven to 350
2. Grease 9*13 pan
3. Melt butter in a medium sauce pan.  Turn off heat and stir in sugar and cocoa.  Add eggs, mix dry ingredients on top of mixture then stir in.  Add chocolate chips and pour into pan. 
4.  Bake for 30-35 minutes- until brownies begin to pull away from pan.  Cool completely before cutting. 

                                           
When they were cool I cut them into little cubes and stuck popsicle sticks into them.   They seemed too wiggly so I put them in the freeze for a little bit.  


While they were freezing I melted down some Make Your Own Bark Chocolate Coating (which is the best thing I have ever used) and then dipped the brownies into the chocolate and sprinkled with valentines sprinkles.  When the chocolate was hard I wrote on the popsicle sticks cute little sayings. 


Jaelyn loves sweet treats! 

Here they are all wrapped up for our special supper tonight.  Now I am off to decorate the kitchen into a restaurant.   Let me know what you guys are up to today! 


Pin It

For more awesome craft projects head on over here

Monday, February 13, 2012

Valentines dishes


This was such a fun project that I was so excited to do with the kids.  From the first time I pinned these valentines dishes on my LOVE board I knew we had the right plates for decorating. 

The "paint" was simple to make 3 Tbsp of icing sugar mixed with 1 tsp of water and then add your food colouring.  I love using the gel food colouring because you only have to use a tiny tiny amount to get such great colours.  

I started off by making pink but of course Eben wanted blue so I made some just for the kids.  Since Jaelyn loves to put things in her month this was great paint for her.  I just put a bunch on her high chair gave her a brush and let her go to it. 


Eben had lots of fun being creative as well.  He used the blue paint to paint the whole plate like the sky.


I love being able to be creative and include the kids in the projects we are doing. Eben was so happy with his creation and thought it was cool he could eat his lunch off of it. 


Here is my valentines dish that I painted for my Valentines party that I hosted over the weekend.  I love how it turned out and that I can use edible paint to decorate my every day plates whenever I feel like it. 


Here is my plate all ready for the party with my chocolate dipped pretezels!  


Saturday, February 11, 2012

Love fortune cookies


Here is a gift I did for my awesome husband.  It was good that he was out at a friends house watching the Super bowl game cause I sure did get a lot done and when he came home (I know its not "valentines" day) he had a box of goodies waiting for him that he can use all month long; since we celebrate LOVE month!

To start by making the fortune cookies you need to cut a circe.  I used a 2" circle punch to do this but you could trace them and cut them out if you didn't have a punch or use your Circut.  Next you fold the circle in half and place a glue dot in the center of your circle.   Then holding with your thumb and middle finger on either end apply some pressure and use your pointer finger to push in the center.


I made all the cookies first and then realized I didn't have anything written out for them; so this is a note for all you who will make these make sure you have the slips of paper written out and place them inside before you fold the paper into a fortune cookie. 


For my fortunes I used plain paper and hand wrote out little love things for my hubby.  I can't share what I wrote not because its inappropriate but because he hasn't opened them yet so I don't want to spoil his surprise but I will encourage you to be creative and give your husband little gifts that you know HE will enjoy. 

To make it look authentic I used this little valentines chinese take-out box to put them all in and wrote a love note for him!  I picked these take out boxes up at the dollar store 6 for $1.00.  


For more awesome ideas head on over to I heart nap time.  Also if you are looking for some last minute projects check out my LOVE board.  

Friday, February 10, 2012

decorative pom poms


I am so excited about tonight.  I am hosting my annual girls Valentines party!    Last year we had so much fun getting together, eating lots of yummy treats and playing some really fun games together.  This year we are in a new house with some new and old friends.  I have been busy this whole month creating and decorating our new house for LOVE month.  Its looking very festive in here and we are loving it.   This week while the kids were napping I made these decorative pom poms.  I made these before for Jaelyn's 1st birthday party and since they are very easy and frugal to make I knew I wanted them up around our house this month.  

First you start out with a pack of tissue paper.  I found it at the dollar store 20 pieces for $1.00.  Divid the pack in two (10 pieces :)) so you can get two pom poms out of one pack.   Starting at the short end begin to accordion fold.  Then fold in half to find the center.  At the center tie some foral wire around the middle.   Also I like to cut the ends into a semi circle shape as you can kind of tell from the picture. 


 Next begin to carefully pull apart the tissus paper like so.    When one side is completely pulled apart I like to tie the rope, string or ribbion that I am going to use around the middle then proceed to do the other side.


When finished you grab your string and pin up where ever you are going to put them. I put some up in our living room over our end table.   Also can you see I put up some more heart garland.


I had these ones up by the time Eben got up from his nap and he looked at me and said "mama that looks so pretty".  So I think I will keep them up until we re paint in the spring time. 


 And what kind of creative kitchen would I have if I didn't have it decorated as well!  Here are 3 more pom poms with heart garland and a sweet valentines printable.


Pin It

Today we are linking up to two new blogs Kitchen fun with my 3 sons  and the Grant Life so head over there and see what other cool ideas you can get. 

Thursday, February 9, 2012

scrabble LOVE

One thing I love is pictures.  I told my husband you will just have to get use to me loving having our family pictures taken, having pictures up around our house, our computer hard drives filled with them and  even having some photo albums full as well.  Although with digital I have become more slack with that.  Anyways I just love pictures and I find they are a great way to decorate your house.  And girls lets face it who doesn't like going into someones house and looking at all the great family photos people have hanging up on their walls. 


Why not combined my love for photos with some scrabble words to go along with love month!   Its such a frugal way to decorate and its looks so creative...you won't have to tell anyone that you saw it somewhere else people will just think you are that smart. 


Using all 4 of the scrabble boards I used the words love you, valentine, be mine and xo! 


I am sure many of you readers who are on pinterest have seen this LOVE (using your engagement ring) photo before so I thought I would try one out.  


Let me know of some things you use around the house to decorate with.  


Wednesday, February 8, 2012

Valentines necklace

Last week while hanging out with my nieces we decided to make some very pretty valentines necklaces. I had first seen the idea at eighteen 25 and knew that these two crafty gals would love to do a project like that.   


We started off by painting the different size beads.  Once they were dry my oldest niece decided she wanted to be a little more creative and add some designs to her beads so she did some poka dots, hearts and lines on her beads. 

After they dried we strung the beads onto pretty ribbion and ta-da craft complete and you got yourself an awesome valentines accessory. 


Here is a picture of Emma's which is so sweet with all the different designs.  So get out some paint and get creative cause this valentines day we will be wearing our own accessories!


For more ideas check out my LOVE board

Tuesday, February 7, 2012

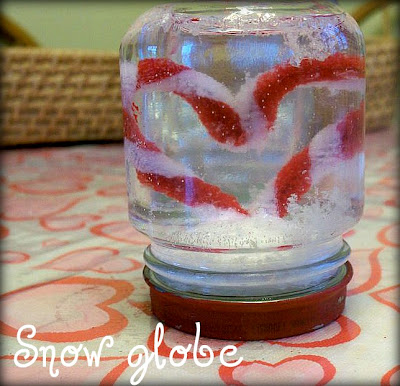
Valentine snow globe


This project was so much fun to do.....NOT!  Some times things look really great on pinterest and then when you try to do them they just don't turn out the same way.  Actually this one turned out nice and is still nice and clear and looks like a snow globe.  The ones the little girls made with a TON of glitter were all foggy and didn't turn out great at all.  So the trick to this was using the right kind of glitter.  You need a tinsel glitter and be careful not to use too much of it. 

So here is what you need.  Below are only a few of the items.
Baby jar
Paint and brushes
Styrofoam ball
glue gun
pipe cleaner
glycerin
water
tinsel glitter


First paint the jar lid any color you would like.  And let dry completely that is also important cause the paint will just come off if its not dry when you are trying to get the lid back on.  Next make a heart with your pipe cleaner.  Cut the styrofoam balls in half and shape to fit inside of the lid.   This is also an important step cause if you don't the heart will not fit inside the jar (you might want to test it before you put the water in the jar) and the lid will not close properly which will equal a huge mess!!!    When the styrofoam ball fits properly you can stick the pipe cleaner through the styrofoam and hot glue it onto the lid.  Next fill your jar up with water adding 1 tsp of glycerin and 1 tsp of glitter.  Next put the lid on the jar and secure tightly and there you have it your pretty snow globe!  


Related Posts Plugin for WordPress, Blogger...