Tuesday, June 24, 2014

Spaghetti Squash Casserole


I want to share with you this delicious family favorite meal that I made the other night that was a BIG hit!!!  I usually make Spaghetti casserole for our family with the left overs we have from a spaghetti supper.   Now that Micah and I have been trying to follow the THM life style I decided to make our favorite casserole using spaghetti  squash.     Let me tell you it did not disappoint!  It was just as delicious if not even better using the spaghetti squash.   So here is the recipe.

Spaghetti Squash Casserole

Spaghetti sauce (mine was homemade but you can use bottled or whatever)
cooked spaghetti squash
2-4 oz melted cream cheese
Cheddar cheese
parmesan cheese
2 handfuls of french fried onions

In the bottom of a casserole dish place a cup of spaghetti sauce.  Add 1/2 of a spaghetti squash.  Now spread your melted cream cheese mixture over the squash.  Now finish up your casserole by layering another cup of sauce, the other half of the squash and top it all off with the remaining sauce.   You can grate some cheddar cheese on the top of it.  Bake at 350 for 30 minutes.  The last 5 minutes of baking you can add your french friend onions.

Serve with some grated parmesan cheese and a caesar side salad.


Friday, June 20, 2014

Trim Healthy Mama


For the past couple of weeks I have been reading through this book, making notes, searching for recipes and putting it into practice.  As of the beginning of this week hubby and I are following their Satisfying (S) and Energizing (E) meals, snacks and treats!


During this week I must confess that I do feel a lot more energetic!!!   I don't feel like I need to have my 1:00 pm nap any more.   I feel very full and satisfied with all the great recipes that I have found.   We are finding that you need to change your mind set from foods we are use to eating and we are learning to change our taste buds as well as we start to cook with different ingredients.

For those of you following the Trim Healthy Mama life style or those of you who may want to look into it.  Here is my meal plan for the next 3 weeks :)  I have found that there are SOOOO many recipes out there on pinterest you shouldn't have a problem coming up with meals.


Breakfast

Brownie Batter Oatmeal


Trim Healthy Pancakes (THM)

Omelets (all different kinds)

Cottage Blueberry Porridge (THM)


Creamy Quinoa (THM)

Broccoli and Cheese mini omelets (great for the freezer) 


Cheesy Sweet Potato Crisp with greek yogurt and berries 

Steal cut oatmeal with cream and sliced berries 

Crustless Asparagus Quiche (use water instead of milk)

Greek yogurt with berries

Sour dough bread with natural peanut butter


Lunch

Greek Salad


Asian Chicken Salad

Cottage Cheese Salad:  Cottage cheese, tomato, cucumber, red onion, salt and pepper.

Chicken Club Salad (use regular mayo)

Salad in a jar 

Turkey wraps – Oven roasted turkey with avocado slices, tomato slices, and cheese rolled up – with cut-up veggies on the side.

Avocado Strawberry Salad


Tuna Salad

Crustless quiche with side salad

Mediterranean Quinoa salad

Feta Avocado Chicken Salad (don't use corn)


Quinoa Pizza bites 

Philly cheesesteak stuffed peppers 

Zucchini pizza - cut zucchini length wise, top with pizza sauce, pepperoni, cheese and bake


Supper

Chicken crumble Casserole with squash and garlic butter green beans

Beef Kabobs

Chickens on sticks with spinach salad

Beef and Broccoli Stir Fry (mushrooms, peppers, onions)

Spaghetti Squash with Meaty sauce


Pork Roast with Cinnamon Sweet Potatoes and oven roast cauliflower

Burgers with Zucchini Fries 

Asian Lettuce Wraps (use beef instead of turkey)

Egg rolls in a bowl

Greek Chicken Skewers with summer Quinoa salad


Taco bowls


Coconut Curry Kabobs with Quinoa

Chicken and Broccoli with Alfredo Sauce

Spaghetti squash au gratin


Desserts/snacks and treats

Peanut butter whip

* This was a BIG hit in the house :) 


Berries with whip cream

Chocolate muffin in a mug


Berry Whip


Berry treat in a jar 

Chunky Cream Pops (THM book)

Peanut butter blizzard 

Skinny Chocolate (THM book)

Strawberry vanilla coconut smoothie

Fat Stripping Frappa (THM book)

Good Girl Moonshine (Favorite drink)


There are so many awesome recipes out there for you to find!!!  If I have learned anything it is having a plan is key to success.  So here are our meals for the next 21 days :)  We have been eating the THM way for 7 days now and hubby is down 5 lb :)  I am thinking after changing our taste buds and enjoying all these yummy foods we will be sticking with it!!!  I truly do feel more energetic :)  If you are looking for a new life style I highly recommend getting the Trim Healthy Mama book and learning a new way to enjoy food and life!!!  If you buy the book and need help I would be more than happy to help you out.  Plus there are hundreds of recipes in their book that aren't even on this meal plan.  Its worth the 35$ thats for sure.


Friday, June 6, 2014

Appschooling

We've been using iPads to teach our kids for a couple years now.  We'd like to pass on what we've learned to save you some time and money!


  1. Before you unleash technology on your kids, make sure you restrict apps that have access to the Internet.  Check out our other nerdy blog on how to protect your home from the dangers of the Internet! youcanbeanerd.blogspot.com.
  2. Apple iPads are the best for safety, ease of use, great apps, you get the apps first, and free app of the week.
  3. Get the big iPad, not the iPad Mini!  You are going to use it to watch movies and the babes need all kins of space to touch everything.  We recommend getting the bigger 64GB model because you run out of space fast and that can be very frustrating.  It's worth the investment!  We also recommend for protection, the m-edge supershell bumper case (not sure if they have one for the iPad Air) and the zagg invisibleshield for the screen cover.
  4. Don't let your kids run to the iPad first thing in the morning, it sets a bad tone for the day.  Schedule your kids to have different times that fit them (the other kids are napping maybe) so that everyone is not always fighting over it.


And finally, here is a list of great apps that our kids use to learn and have fun doing it!


Math


Reading


General Learning


Writing


Chess
JP Chess HD
Lean Chess
Chess
DinoChess


Hacking
Hopscotch
Cargo-Bot
Daisy the Dino
Light-bot hour
codecademy
Basic

Monday, May 12, 2014

DIY designs on PicMonkey


I really love using PicMonkey.   I have used it to edit pictures, make picture collages and also to add text to my pictures but lately I have been using it to make meeting reminders, birth announcements and now this dedication card.   Before I give you the steps on how I made this I will let you know that I did purchase their Royale package...which you can try for free for 1 week!!!  

Step 1
Choose Design and then I picked 5 * 7


Step 2 
Your design will take you to choose a canvas color.  I knew that for this one I wanted a chalk board back ground so I went to Themes - School U - Textures - Boards - Chalk Board


Step 3
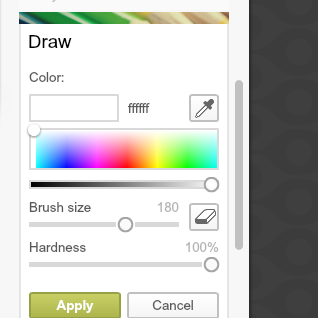
I wanted a white boarder outline and this part took me the longest to figure out so that is why I am giving you some step by step to help you not take so long!  It took me the longest to find where the "draw" tool was.   First you go to Effects (sparkling wand)


Then down to Artsy


And open Draw


I used a 13 brush size to make my white lines.  First I started with drawing the lines on the top and bottom.  If you hold down the shift bar while doing this it will make your lines straight!!!  However I couldn't figure out how to go up and down the side of the picture using the straight line way so I saved the two lines I did.  Then I went back to Basic edits and rotated the picture.  Went back to sparkly wand and did the top and bottom of the picture again using the same brush size.  If they didn't connect just right I used the easer on the draw feature to undo my mistake. 

Step 4
Bring in the picture you want to use. I did this using Over Lays


and choose Your Own


I stretched the picture to fill in the bottom half of the design.  

Step 5
Now for the chevron pattern.  I googled free chevron patters and came across ALOT of different colours for this.   I choose a grey pattern for this little guy.  Now in the same Overlays place you add your own again and pick the pattern you had saved to your computer.  I had to do some playing around to make this one fit just the way I wanted it to.  You can do that by duplicating your patterning simply by right clicking and choosing 


I had to do this a few time in order to get the look I wanted.  To make sure your pattern goes under your picture right click again and choose Send to back or Send backwards. 


 Step 6
Now for the bunting.  I really wish there was an easy way to do it...if you know please give me some tips!  First I went to overlays


then to Geometric shapes and chose the triangle 


Using this spinning feature I created my own bunting.  To make more then one triangle and have them all the same size and color you simply right click and select duplicate overlay. 


Step 7
Now its text time.  You can find a whole lot of fonts in this program which I LOVE so I used a few different ones and lined them up and ta-da my finished product.  A invitation to join us to dedicate our 4th baby!!!  


I should also mention that this photo was taken by my talented friend at Mason Photography!!!   If you have any step by step tutorials for projects you have done on picmonkey please let me know :) 


Monday, March 31, 2014

Monster Cookies


These cookies have become one of our new favorites in the Peterson house!  I must admit I am a sucker for peanut butter and chocolate mixed together and that is exactly what these cookies are.  They are a delicious mix of peanut butter chocolaty goodness. 


I must admit that I love a cookies recipe where you can put all the ingredients in the kitchen aid and let it do the work for you.  The recipe comes from Recipe Girl.  The only thing I have changed about the recipe is that we use natural peanut butter.  I have made this recipe a few times now and this was the first time I used M&M's in them.  Other times I use chocolate chips and white chips.  I have even done chocolate chips with peanut butter chips.


This recipe makes a very large batch.  I am pretty sure I got 50 cookies out of it.  Its more than enough to fill up the cookie jar and put some away in the freezer for those times you just need a cookie... which reminds me :) 

Here is the recipe

1 1/2 cups creamy or chunky natural peanut butter
1 cup packed light brown sugar
1 cup granulated white sugar
8 tablespoons (1 stick) unsalted butter, softened
3 large eggs
1 tablespoon vanilla extract
4 1/2 cups quick cooking oats
2 teaspoons baking soda
1 cup semi-sweet chocolate chips
1 cup M&M's plain chocolate candies

directions:
1. Preheat oven to 350°F. Line a cookie sheet with parchment paper.

2. In a large bowl, combine the peanut butter with the sugars and butter, mix until well combined. Mix in the eggs and vanilla. Mix in the oats and baking soda. Then stir in the chips and M&M's.

3. Drop the cookies by heaping spoonfuls onto the prepared cookie sheets. .

4. Bake 10 to 12 minutes. Do not overbake. Cool for 5 minutes on cookie sheets until cookies are set. Transfer to wire racks; cool completely before storing in an airtight container.


Saturday, March 29, 2014

Long winter

These past 10 weeks (since the new baby came) have seem to have flown by and at the same time its been a really LONG winter.  Even though the calendar says its Spring; we are still feeling cabin fever with crazy blizzards that just keep coming. 

Since I haven't been in the kitchen too much over these past couple of months due to adjusting to life with 4 little ones.  Here are some things that we have been doing. 

Eben had a chance to do ski school this winter and enjoying learning how to down hill ski.  


Jaelyn enjoyed taking dance class and being in her first dance recital.  It is such a blessing to have a wonderful women teach her how to worship Jesus with dance.  There were 20+ 3 and 4 year old in her class and they did a great job.  It was special to see so many daddy's there with flowers for their daughters.  J got a beautiful pink Gerber daisy. 


Every day is an adventure around here while we try at stay warm inside.  Our days are filled with school time, creative play and reading.  I really love how Eben enjoys reading aloud to his siblings. 


Jaelyn has become a great mommy helper with her little brother.  She is such a loving servant who is always hugging and kisses Isaiah.   Over March break we had some family visit for the first time to meet the baby which was fun for the kids.  Grampy has made a few trip out to bring us pizza for lunch and to play Yahtzee with the kids.  And to keep busy while Eben is in school Abraham has learned to build train tracks. 


We are hoping that the spring weather comes soon so we can get outside and play.  How have you been dealing with this LONG winter. 


Friday, March 28, 2014

Peterson Love Day


This year we started our LOVE festivities off with a home-school valentines social.  The social committee who planned the event did a great job with games, crafts, snacks and this awesome photo booth they put together. 

There were so many great props there I decided to make my husband a valentines card this way!  


Every year for Love day we let the kids pick a restaurant theme and a meal they want to enjoy.  The past two years Eben got to pick the restaurant and it has been some video game theme.  This year since Jaelyn is older now she got to pick the theme.  I loved having a girl theme with her!  

Welcome to our Strawberry Shortcake Waffle Cafe


First off to go to a fancy restaurant you have to be dressed up.  So the kids got into their finest clothes. 


Then we made some decorations for our restaurant.


For our waffle bar we made a double batch of waffles and had all kinds of toppings for them.  Strawberries, blueberries, blackberries (see the theme), bananas, whip cream, chocolate sauce and of course chocolate kisses.   The kids got to dress up their waffles however they wanted.


When daddy got home from work he had two roses.  A beautiful blue rose for Lady J and a pretty white and pink rose for mama.  Along with our roses he had two funny cards for us gals.   Eben was lucky that night and got a free stay up late card to hang out with us when the little ones went to bed. 


We also had valentines for each other in our LOVE boxes.  Jaelyn's valentine to daddy brought tears to his eyes!! hehehe. 


Related Posts Plugin for WordPress, Blogger...